
If you want to start learning how to build websites or web apps the most basic thing you need to understand is that HTML is the standard language of the internet. It’s not the only language – websites can also, for example, be written in other languages like JavaScript, PHP, Python – but HTML is the original language Tim Berners-Lee developed for the world wide web back in 1989 and the language that browsers by default understand today.
HTML stands for Hypertext Markup Language. Although it’s part of the coding universe, it’s not considered a programming language. As its name says, it’s a markup language. The term markup comes from the traditional behavior of physically making notes – or marking up – content on a physical page – think of highlighting in a textbook or making edits on a paper in school.
HTML takes the content of a webpage and digitally marks it up to communicate to a browser the structure of the page and how each piece of content should be formatted – for example, it explains if a piece of text is a header or body copy.
HTML Structure
To understand HTML, you need to first understand the 3 basic types of components that make up the written language:
- Tags: This component defines for the browser what the content is – a header, an image, etc. – and always begins and ends with angle brackets (< >) as seen below. There are over 100 unique tags in HTML5, the latest version of the language.
<title>
- Elements: This component usually consists of an opening tag (written: <example> ) and a matching closing tag (written: </example>) along with the content that you want to appear onscreen written between the tags. Some elements are called empty elements because they don’t have a closing tag or contain content. <br>, which causes a line break to appear onscreen, is an example of an empty element.
<h1>content</h1>
- Attributes: This component is placed within tags to provide the browser with additional information about the content contained within the element. An element can have multiple attributes. They are usually included within the start tag and use the structure name=”value” as seen below.
<h1 class="example">content</h1>
These 3 components used in conjunction with each other help you to write an HTML file containing the content of a webpage. Whenever you enter a URL in a browser, the browser asks a server for the HTML file corresponding to that URL, then opens and reads that file to display the webpage for you. No matter the content, all HTML documents follow the standard written structure as seen below.
<!DOCTYPE html>
<html lang="en">

  <head>
    <meta charset="UTF-8">
    <title>Title of the document</title>
  </head>

  <body>
    <h1>Input heading here</h1>
    <p>Input first paragraph here.</p>
    <img src="filename_of_the_photo_you_are_using.jpg" alt="Sample image
    file" width="set size in pixels here" height="set size in pixels here">
  </body>

</html>
The necessary parts of an HTML document include:
- <!DOCTYPE html>: this part tells the browser this is an HTML5 document and to read it as such.
- <html>: This part is the root of the document. You can think of HTML visually as a bunch of boxes within boxes. The tag or root of a document is the box that contains all other boxes, or elements. It’s important to include a language attribute in your <html> tag. This defines the language that the content in the document is written in, which helps search engines and browsers. This also helps assistive devices like screen readers pronounce words more accurately for a user, making the page more accessible.
- <head>: This part contains any meta information about the page which you want to deliver to the browser, such as CSS (cascading style sheets) which defines the visual styling of the page’s content. Important meta information to always include in a <head> is the encoding format of the file to make sure text characters appear correctly onscreen. The standard now is <meta charset=”UTF-8″.
- <title>: This part is contained within the <head> and defines the title of the HTML document itself. The contents of the <title> element will be visible on the browser tab, so pick something that is appropriate and makes sense for the content of the page.
- <body>: This part contains all the visible content of a webpage such as headings, paragraphs, images, hyperlinks, tables, lists, etc. The order from top to bottom of the content here will determine the order in which it appears onscreen.
HTML DOCUMENT EXAMPLE

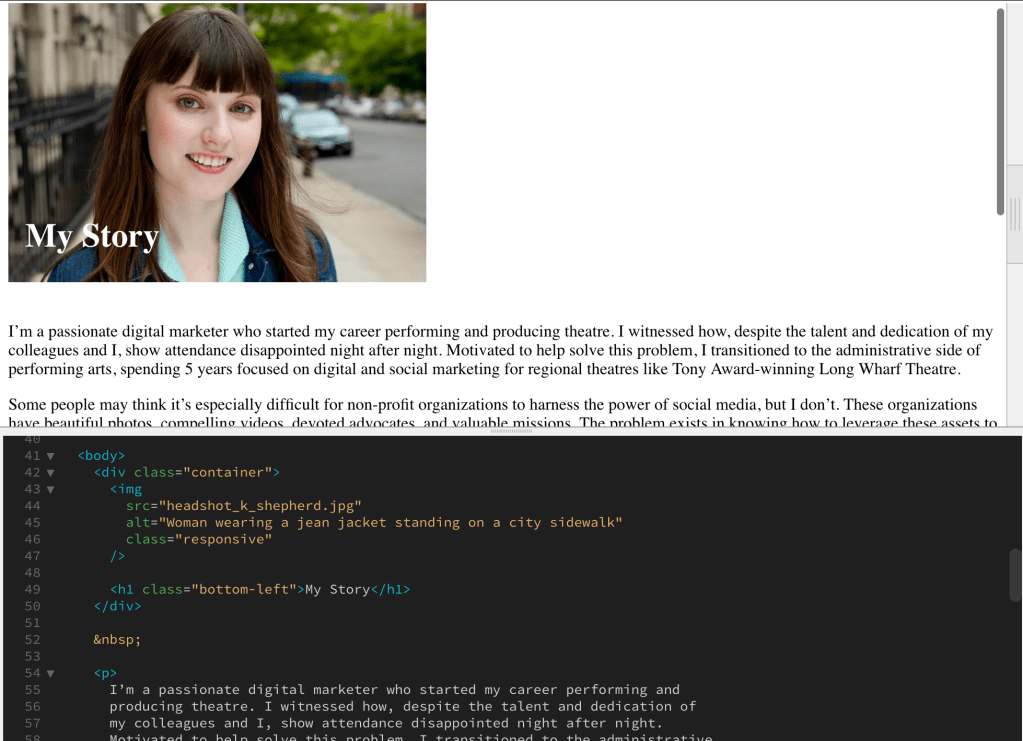
I’ve taken the content of my “About Me” page here on my blog and used it to create a basic approximation of what the HTML document for that page would look like. Once you understand the syntax that governs the structure of the HTML language and the format of an HTML document it’s easy to write a basic piece of HTML as I have above.
First, I identified which tag needed to be used to correctly define each piece of content on my page. I used a <h1> for the top heading on my page – “My Story” – because hierarchically it’s the most important heading on the page. The next heading – “My Mantra” – was labeled as a <h2> because it was of less importance. Note that there can only be one <h1> on a page, but multiples of any other heading such as <h2>. The body copy of my bio was labeled with <p> for paragraph and my photo was labeled with <img> for image.
As I mentioned previously, there’s a long list of tags. The ones I’ve used in my example are some of the most common tags for <body> content and some of the most useful to remember, but by no means do you need to memorize every possible tag available. A simple Google search or a visit to a resource like W3Schools can always help you find the right tag for any need.

Now you may be wondering how I got my top heading to appear over my image, approximating how it’s displayed on my “About Me” page. I’ve placed attributes on this content that are linked to a little CSS I’ve included in my <head>. There are 3 ways to include CSS in your HTML document.
Inline CSS applies style only to a single element using a style attribute. Internal CSS defines style for a single webpage via a <style> tag which adds a <style> element to your <head> containing CSS directly written in your document. External CSS can be used to define style for multiple webpages and is added to your HTML document via a <link> tag with which you place a <link> element in your <head> containing the link to a CSS document on the server.

I’ve chosen to use internal CSS because I’m only adding a little styling and this is easier than writing a whole new document, plus it feels more practical than inline CSS since I may want to apply this styling to other images and headings in the future. However, the more CSS you’re using to style your HTML, the better it is to create one or more external CSS documents to avoid the need to rewrite or edit the same styling in multiple HTML documents.
Writing everything inside one HTML document can also make it cluttered and confusing to read, find things, and make edits. Remember that the visual organization and readability of your code matters, especially if others may have to work on it at some point. There are code beautifiers online such as Prettier that can help you visually clean up your code if you’re unsure how to do so yourself.
In order to get my heading over my photo, I added two class attributes. A class attribute normally points to a corresponding class name written in CSS (example: .bottom-left) which contains the style characteristics you are wishing to apply. In this case, as I’ve explained, I’ve added class names to my HTML document <head> via <style> tags.
 <style>
      .bottom-left {
        position: absolute;
        bottom: 8px;
        left: 16px;
        text-align: left;
        color: white;
      }
</style>
One attribute I applied to the <h1>, class=”bottom-left” as seen above in CSS, uses absolute positioning which tells the browser to ignore the place it would normally put this header and instead place it 16 pixels from the left and 8 pixels from the bottom. This alone isn’t enough, though, as the browser by default assumes you mean 16 pixels from the left of the whole screen and 8 pixels from the bottom of it.
<style>
      .container {
        position: relative;
      }
</style>
The other attribute I added, class=”container” as seen above in CSS, fixes this problem because it uses relative positioning which tells the browser to use whatever element this is applied to as the frame of reference for any positioning defined within it. I applied this attribute to a <div> tag in which I had placed both my <img> and <h1> elements.
A <div> tag defines a division or section within a page. This section becomes the parent of everything inside of it – boxes within boxes, remember? So, by putting my <img> and <h1> inside the same <div> I can use it as the reference point for the positioning of these elements.
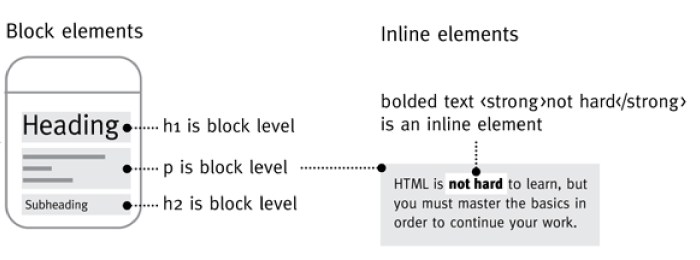
<div>, <img>, and <h1> are all block elements which take up the full width of the screen and stack one on top of the other, as seen above. Nothing can sit beside them like it can with inline elements, such as <strong> which makes the weight of text stronger or bold. My <h1> element automatically sits below my <img> element, but when I apply an attribute to it to change its position in relation to the <div> it causes the <h1> block to shift up and appear over the image.
Another attribute I added was to make sure my image would fit appropriately on any device. Responsive design, which I’ll be writing more in-depth about in an upcoming post, is essential to ensure good cross-device user experience. To make sure your entire webpage is responsive, Google recommends adding the following to your <head>:
<meta name="viewport" content="width=device-width, initial-scale=1" />
This makes sure your page’s content always sizes to the device it’s displayed on. However, images are a little trickier. You can add width and height classes to an <img> tag, but this hard defines the dimensions of your photo, such as to 400 pixels wide. Every device, though, has different pixel dimensions. 400 pixels may be too wide on a certain device and cause a horizontal scroll, which is never desirable for a good user experience.
<style>
      .responsive {
        width: 100%;
        max-width: 400px;
        height: auto;
      }
</style>
Using the attribute class=”responsive”, as seen above in CSS, on my <img> tag allows me to tell the browser this image should be 100% the width of whatever box it’s in, but never exceed my desired 400 pixels, and also adjust its height automatically to keep it from being abnormally stretched outside its original aspect ratio.
Testing, Debugging, and Uploading
Once you think you have an HTML document complete it’s important to test it to make sure it looks how you want and that there aren’t any problems with your code. I used Dreamweaver to build my HTML document, which provides a split-screen option as shown above where you can see the browser view of your code as you write it, making it easy to visually spot problems.
You don’t, though, have to use a program like Dreamweaver to write HTML. You can simply use a plain text editor. In this case, you would just need to save your work as an .html file and open it using a browser, such as Chrome, to see how your work will appear onscreen.
However, it’s really easy to miss a problem when writing HTML. Something as simple as a missing backslash can mess things up and it can be a big waste of time trying to find such a small problem. To help, you can use a code validator to check your work for mistakes before finalizing it.
After your HTML document is to your liking and ready to go live you need to put it on a server so that a browser can access it. This is accomplished using a file transfer protocol (FTP) which helps you transfer files from your computer (a client-side device) to a server where your website is hosted. Although I used Dreamweaver which has a built-in FTP, my server just doesn’t get along with it for some reason. Instead, I used FileZilla which is a popular FTP you can download for free.

After logging in to your server through FileZilla you will see a window with 2 columns, as shown above. The left is the list of all your folders and files on your computer and the right is your folders and files on the server. To upload, you just need to navigate on the right to the folder on your server where you want to place your files, then on the left navigate to the files you want to upload that are on your computer, right-click them, and choose “upload.” This will automatically copy them to the folder you have chosen on the server. You can then go to the URL for the HTML file you just uploaded to see it live. You can visit the URL for my “About Me page example exercise below.
The only important note about this process is to remember to place any media files, like images, that you may be uploading into the correct location on the server. Media is only embedded in webpages which means your HTML document only provides a reference location from which the browser can pull that piece of content to make it viewable on your page.
The link to a media file can be a URL or a folder location on your or someone else’s server. Whatever location you’ve written in your HTML document, just be sure it’s where that media file is or else there will be a blank spot on your page.
For example, I placed my image file in the same folder as my HTML file on the server for the purposes of this exercise. Therefore, in my HTML document, my reference to my image only needed to be the file’s name – “headshot_k_shepherd.jpg.” If I’d put it in a specialty folder for images, though, I would have needed to write in my HTML document “images/headshot_k_shepherd.jpg” for it to be found by the browser.
Find The Logic, Find Your Way with HTML
My hope, now that you’ve reached the end of this post, is that none of what I’ve said here is that intimidating. No matter the language, whether it be spoken or written for a computer, there’s a system that once learned makes the language feel more natural to use.
I speak English fluently. I know what verbs, nouns, adjectives are. I know how to construct a sentence and which punctuation to choose to convey appropriate meaning. But I still run into words I don’t know. However, because I know the system that is English, I can quickly start to deduce what part of speech it is, its meaning, its pronunciation, and I know how to look it up in a dictionary. Nothing about this process is scary because English is familiar to me.
Coding, though, no matter how it’s presented, carries this scary mystique of being difficult or only for geniuses. But HTML can be a great vehicle to use to start overcoming that barrier. Plus, it’s a lot more straightforward than English is in its ruleset. Embrace the basic logic of HTML. It won’t lead you astray. In fact, understanding it could give you a whole new perspective the next time you visit a website.
References
CSS introduction. W3Schools. Retrieved from https://www.w3schools.com/css/default.asp
CSS layout – The position property. W3Schools. Retrieved from https://www.w3schools.com/css/css_positioning.asp
How to – Position text over an image. W3Schools. Retrieved from https://www.w3schools.com/howto/howto_css_image_text.asp
How to – Responsive images. W3Schools. Retrieved from https://www.w3schools.com/howto/howto_css_image_responsive.asp
HTML block and inline elements. W3Schools. Retrieved from https://www.w3schools.com/html/html_blocks.asp
HTML <div> tag. W3Schools. Retrieved from https://www.w3schools.com/tags/tag_div.asp
HTML element reference. W3Schools. Retrieved from https://www.w3schools.com/TAGS/default.ASP
HTML elements. W3Schools. Retrieved from https://www.w3schools.com/html/html_elements.asp
HTML <html> tag. W3Schools. Retrieved from https://www.w3schools.com/tags/tag_html.asp
HTML <h1> to <h6> tags. W3Schools. Retrieved from https://www.w3schools.com/tags/tag_hn.asp
HTML <img> tag. W3Schools. Retrieved from https://www.w3schools.com/tags/tag_img.asp
HTML introduction. W3Schools. Retrieved from https://www.w3schools.com/html/html_intro.asp
HTML <link> tag. W3Schools. Retrieved from https://www.w3schools.com/tags/tag_link.asp
HTML <p> tag. W3Schools. Retrieved from https://www.w3schools.com/tags/tag_p.asp
HTML <style> tag. W3Schools. Retrieved from https://www.w3schools.com/tags/tag_style.asp
HTML the class attribute. W3Schools. Retrieved from https://www.w3schools.com/html/html_classes.asp
Kolowich, L. (2020, May 29). Web design 101: How HTML, CSS, and JavaScript work. HubSpot. Retrieved from https://blog.hubspot.com/marketing/web-design-html-css-javascript
Kyrnin, J. (2020, March 6). What are markup languages? Lifewire. Retrieved from https://www.lifewire.com/what-are-markup-languages-3468655
LePage, P. & Andrew, R. (2019, February 12). Responsive web design basics. Google. Retrieved from https://web.dev/responsive-web-design-basics/
Lawson, B. (2020, June 8). Beginner’s guide to writing good HTML. WebsiteSetup. Retrieved from https://websitesetup.org/html-tutorial-beginners/
Martindale, J. (2020, April 14). What is FTP? Digital Trends. Retrieved from https://www.digitaltrends.com/computing/what-is-ftp-and-how-do-i-use-it/
Moyers, S. Common web design languages, what they do and why you need them. Spinx Digital. Retrieved from https://www.spinxdigital.com/blog/common-web-design-languages-what-they-do-and-why-you-need-them/
Shekhawat, R. (2018, August 24). Clean code principles: Be a better programmer. Simple Programmer. Retrieved from https://simpleprogrammer.com/clean-code-principles-better-programmer/